Ramp Installation for Aging in Place Permanent vs Portable Options
Practical modifications for safety and independence
A ramp can be the difference between staying in your home comfortably and struggling with steps every day. The choice between permanent and portable comes down to your timeline, budget, and how long you plan to stay in your home. Both options expand your capability to move freely between spaces. This guide walks through both approaches so you can choose what works for your situation and budget.
About costs: Portable ramps run $150–1,200 depending on length. Permanent ramps typically cost $2,000–5,000 installed. Many qualify for insurance reimbursement or home modification grants.
1
Portable Ramp Options
Threshold ramps for small steps
$150–300 · Handles 1–3 inches
These sit right at the door and handle small height changes. They stay in place for daily use and require no installation. Best for front doors, sliding glass doors, and interior doorways with small lips.
Folding ramps for moderate rises
$300–600 · Up to 6 feet long
Folding ramps work well for rises under 4 inches and occasional use. They fold in half for storage and transport. Good for homes where you need access at more than one entrance or want to bring it along when visiting other places.
Modular portable systems for longer distances
$600–1,200 · Configurable for rises up to 24 inches
These snap together in sections and can be configured for longer distances and higher rises. They offer the most flexibility without permanent construction. Some models include optional anchoring for semi-permanent placement.
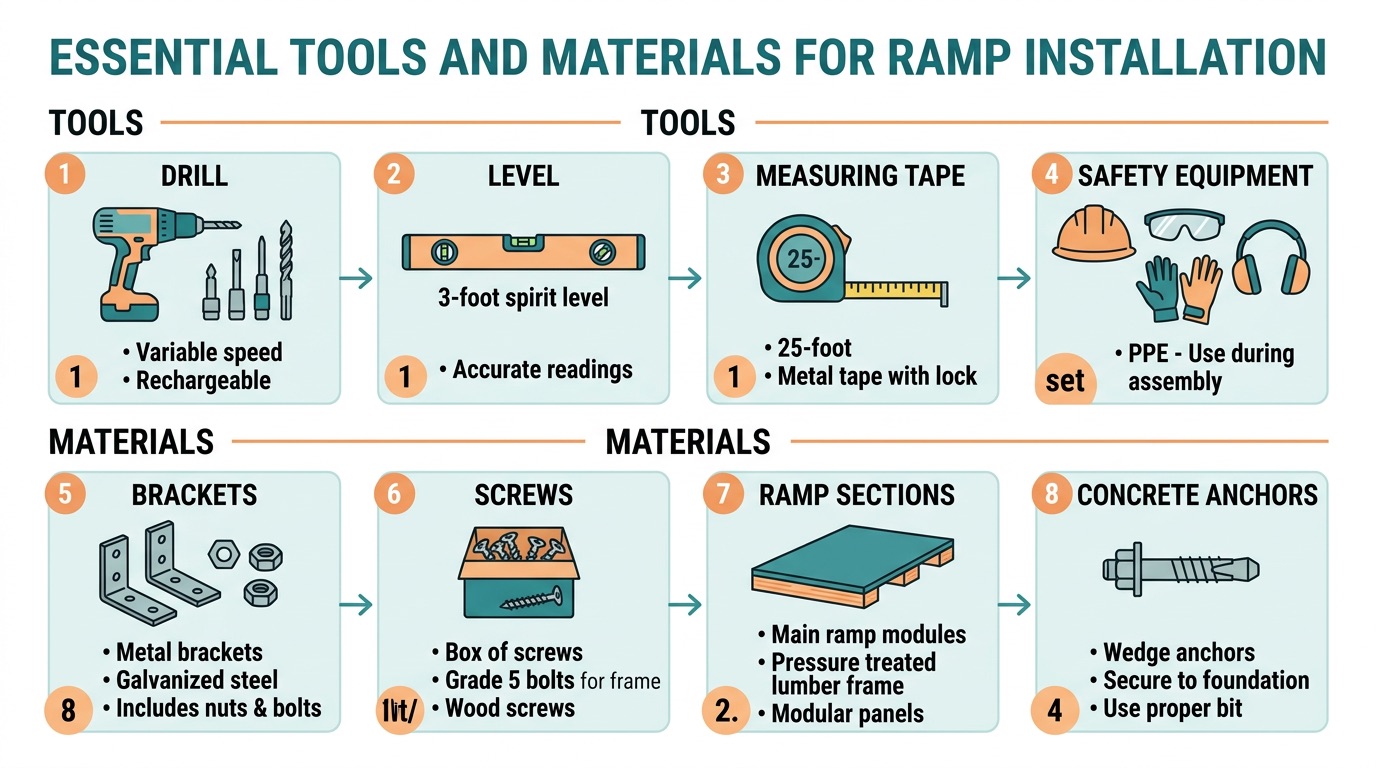
Tools and materials for ramp installation
2
Installing a Portable Ramp
Measure your rise and determine length
Step 1
Measure the vertical height from ground level to your door threshold. For every inch of rise, you need 12 inches of ramp length. A 6-inch rise requires a 6-foot ramp for safe navigation.
Position and test for proper fit
Step 2
Place the ramp so the top edge sits flush against your threshold surface. Check that both sides sit evenly on the ground. Walk up and down slowly to test stability and comfort before regular use.
Secure and add safety features
Step 3
Some portable ramps have holes for optional anchoring to concrete or wood. Use provided hardware if your situation allows semi-permanent placement. Install edge guards where the ramp meets concrete, and add reflective tape along edges for low-light use.
A properly installed ramp provides safe, independent access
3
Permanent Ramp Construction
Design and obtain permits
Step 1 · Check local codes first
Calculate total length using the 1:12 ratio (one foot of ramp for every inch of rise). Design landings every 30 feet and at the top. Submit plans to your local building department for permit approval before starting any construction.
Dig and pour concrete footings
Step 2 · Allow 48 hours to cure
Dig holes 2 feet deep and 12 inches wide, placed every 6–8 feet along the ramp length and at all corners. In cold climates, footings must extend below the frost line. Insert galvanized anchor bolts while concrete is wet, leaving 3 inches exposed.
Build the frame and install decking
Step 3 · Pressure-treated lumber required
Construct the frame using 2x10 pressure-treated lumber for joists and 2x8 for the perimeter. Attach 5/4-inch decking boards perpendicular to joists, leaving 1/4-inch gaps between boards for drainage. Countersink all screws below the surface.
Install handrails and non-slip surface
Step 4 · Code requires rails on both sides
Mount handrails 34–38 inches high on both sides. Handrails must extend 12 inches beyond the top and bottom of the ramp per building codes. Apply non-slip strips across the width every 12 inches, or use a textured coating designed for exterior wood.
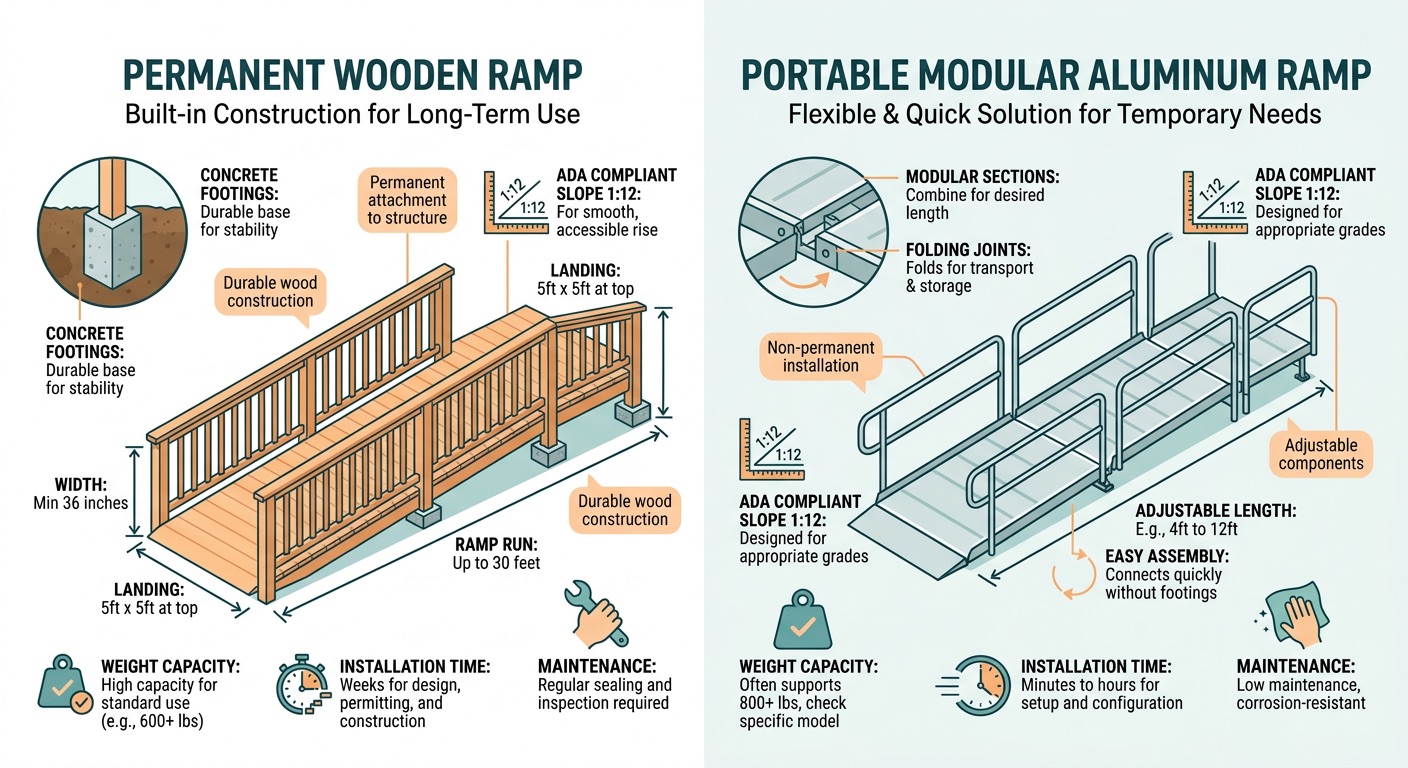
Permanent vs. portable ramp comparison
4
Common Mistakes to Avoid
Choosing length based on storage space instead of safety
Safety risk
A ramp that is too short creates a steep angle that defeats the purpose. The 1:12 ratio exists for safety. A 6-inch rise needs 6 feet of ramp length minimum. Never compromise on this number.
Skipping required landings
Code violation
Ramps over 30 inches long need a level landing for resting and maneuvering. This is a code requirement for permanent ramps and a safety best practice for portable ones too.
Building without permits
Legal and resale risk
Most areas require permits for permanent ramps. Unpermitted work can cause problems when selling your home and may not meet the safety standards that protect your family.
Ignoring drainage
Creates ice and slip hazards
Water that pools on ramps creates ice in winter and slip hazards year-round. Permanent ramps need proper drainage built in. Portable ramps need positioning where water runs off naturally.
No maintenance plan
$50–150 per year
Permanent wooden ramps need annual inspection and periodic staining or sealing. Metal components need rust prevention. Budget time and money for upkeep, or safety degrades over time.
5
Budget Breakdown
Portable: Threshold ramps
$150–300
Handles 1–3 inch rises. Simplest option, no installation needed. Add $100–200 if you want professional help with positioning and anchoring.
Portable: Folding ramps
$300–600
Up to 6 feet long, folds for storage. Good middle ground between cost and capability for moderate rises.
Portable: Modular systems
$600–1,200
Configurable for longer distances and higher rises. Most flexible portable option for changing needs.
Permanent: Materials for 20-foot ramp
$800–1,500
Lumber, hardware, concrete, handrails, and non-slip surface. Quality materials matter for longevity and safety.
Permanent: Professional installation
$2,000–5,000
Includes design, permits ($100–300), construction, and inspection. Recommended for ramps over 30 inches long. Permanent ramps may qualify for insurance reimbursement and home modification grants.
Tips for Success
Test before you commit. Rent a portable ramp for a week before purchasing. This lets you test the length and style that works best for your specific situation.
Plan width for the future. Standard width is 36 inches, but 48 inches provides more comfort and allows someone to walk alongside a wheelchair user.
Think about winter. Aluminum ramps can be moved indoors during harsh weather. Permanent ramps need snow removal plans. Heated ramp mats exist for cold climates.
Start portable, upgrade later. A portable ramp lets you test the concept and determine exact placement before committing to permanent construction.
Helpful Resources
ADA Guidelines for official ramp construction and slope specifications