Room by room modifications that make a real difference
Your bathroom should feel like yours. Comfortable, familiar, and set up to work the way you need it to. Most bathroom safety improvements are small, affordable, and something you can work through over a few weekends. This checklist walks through every part of the bathroom so you know exactly where to start.
A note on costs and difficulty: Prices listed are for materials only. Some items require basic tools (a drill, stud finder, screwdriver) and a comfort level with simple home projects. A professional can handle any of these quickly if you'd prefer. The "DIY" label means the project is doable without specialized training.
1
The Shower and Tub
Install a grab bar where you step in and out
$15–40 · DIY (drill + stud finder)
This is where most bathroom falls happen. A single bar at the entry point makes a real difference.
Add a second grab bar inside the shower at shoulder height
$15–40 · DIY (drill + stud finder)
Gives you something to hold while standing with your eyes closed under the water. Sounds small until you need it.
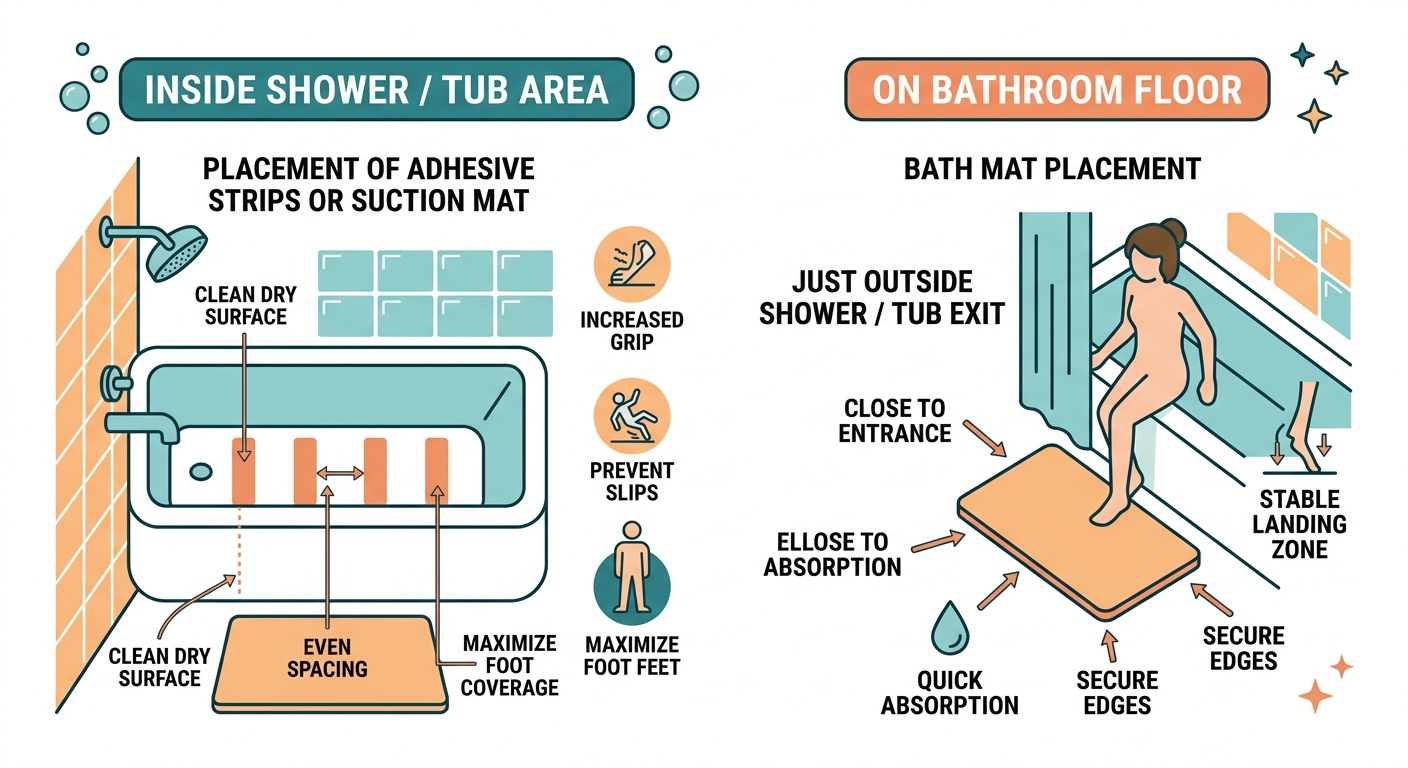
Place non-slip adhesive strips on the tub or shower floor
$5–12 · Beginner
Wet surfaces and bare feet are a predictable combination. Adhesive strips cost almost nothing and are straightforward to apply.
Switch to a handheld showerhead
$20–60 · DIY (wrench needed)
You can sit while showering, rinse without twisting, and control the water direction. More comfortable and safer.
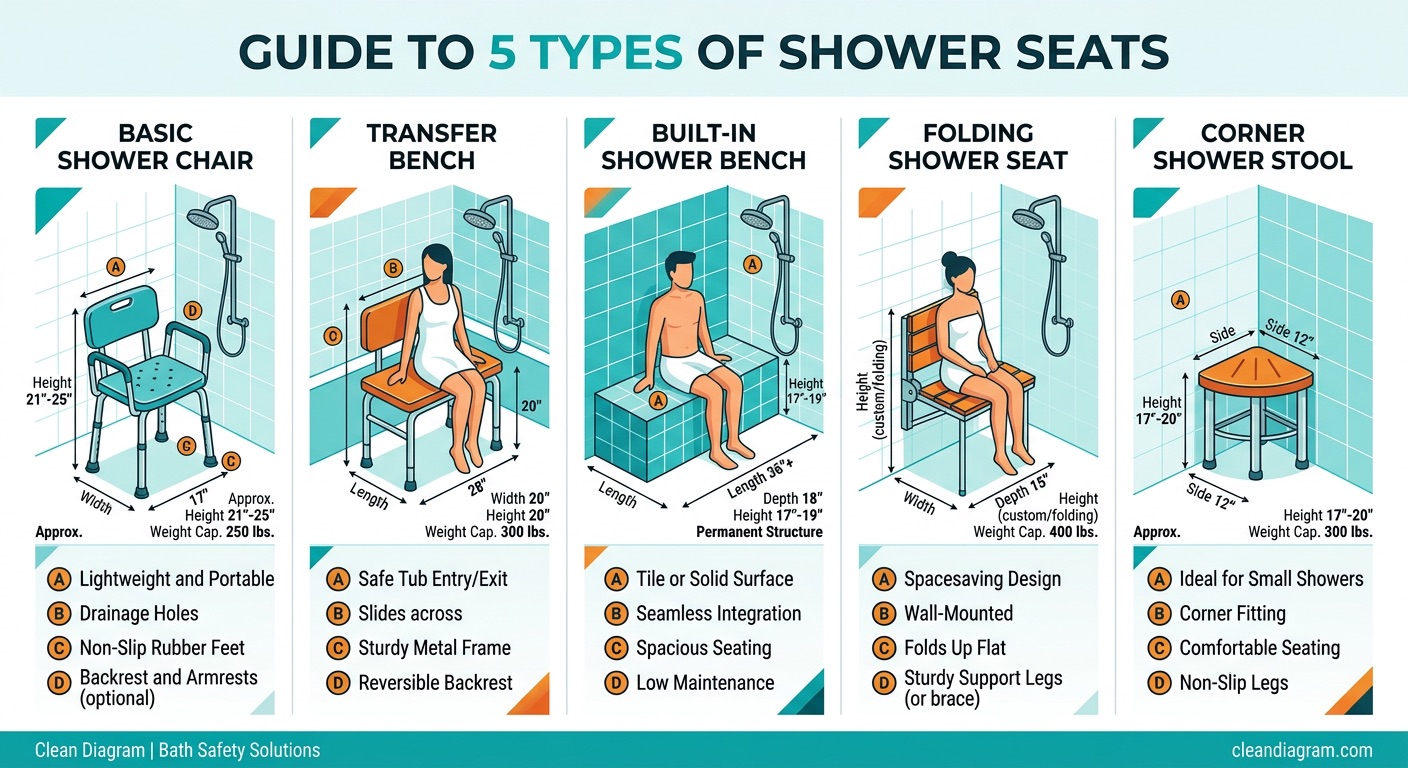
Consider a shower chair or transfer bench
$30–120 · Ready to use out of the box
Standing for 10 to 15 minutes in a wet space takes more energy and balance than most people realize. Sitting is a practical option that makes showering more comfortable.
Adhesive strip and bath mat placementShower chair and bench types compared
Check the water temperature setting on your hot water heater
Free
Set it to 120°F or below. Older skin is more sensitive to heat, and keeping the temperature at 120°F is a simple way to stay comfortable.
Replace glass shower doors with a curtain rod and curtain
$20–50 · DIY or professional
A shower curtain on a curved rod gives you more room to move and is easier to manage. If the doors stick or require force, a curtain is a worthwhile swap.
2
The Toilet Area
Measure your toilet seat height
Free
Standard toilets are 15 inches. If getting up takes extra effort, a raised seat or comfort-height toilet makes a real difference. Your knees and hips will notice immediately.
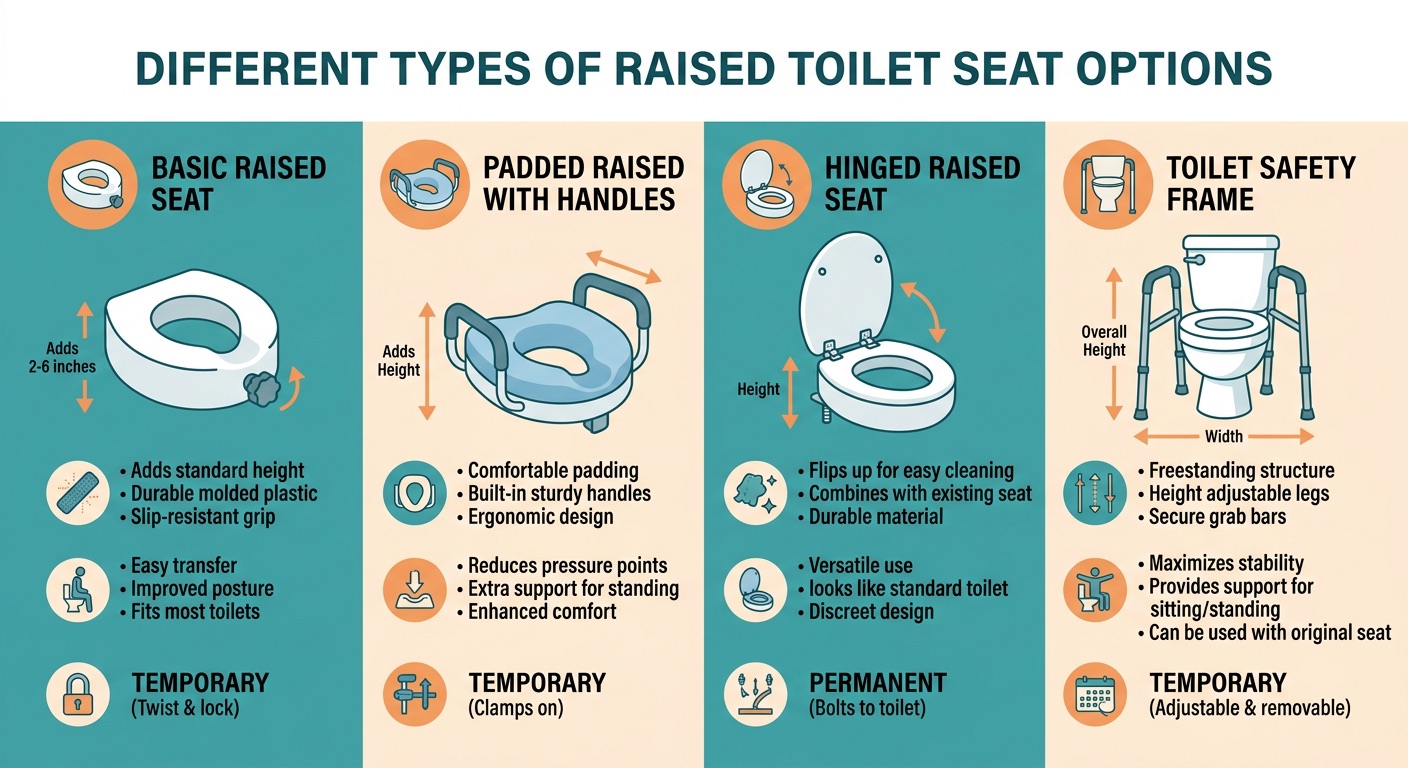
Install a raised toilet seat if yours is standard height
$25–60 · Beginner (tools-free on most models)
Adds 2 to 4 inches. Sits right on top of your existing toilet and most lock in place. Straightforward to set up.
Raised toilet seat options compared by type, height, and features
Add grab bars on one or both sides of the toilet
$15–40 per bar · DIY (drill + stud finder)
Getting up from a low seated position uses more strength than you'd expect. Bars give you leverage and make the motion easier.
Keep a clear path to the toilet from the door
Free
Move rugs, hampers, or anything else that could catch a foot, especially at night. A clear path makes a difference.
Consider a toilet safety frame if wall-mounted bars aren't an option
$30–70 · Beginner
Freestanding frames bolt to the toilet itself. A good option for renters or bathrooms where drilling into walls is complicated.
3
The Floor
Replace loose bath mats and rugs with non-slip alternatives
Free to remove, or $15–30 for a non-slip replacement
Loose mats are one of the most common trip hazards in any bathroom. If you want a mat, use one with a strong rubber backing that stays put.
Check for cracked, loose, or uneven tiles
Varies · Professional
A slightly raised tile edge catches toes. If you notice tiles shifting or grout crumbling, getting them fixed is worth the investment.
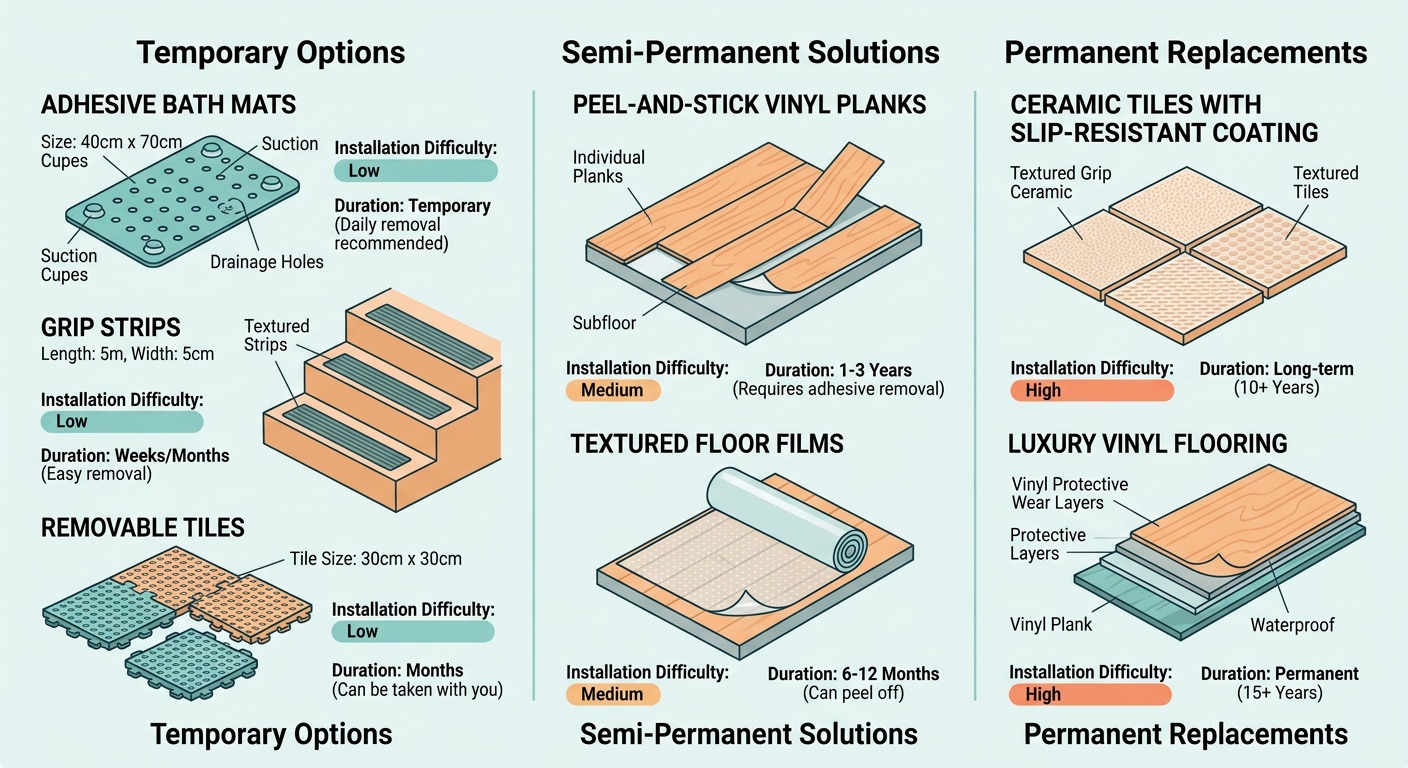
Non-slip flooring options compared
Add a non-slip bath mat right outside the shower
$10–25
Wet tile is the most predictable hazard in the room. A non-slip mat at the shower exit catches the water before it spreads across the floor.
Consider textured or slip-resistant flooring
$500–2,000 depending on bathroom size · Professional
If you're already planning a renovation, this is worth the investment. Textured vinyl or slip-rated ceramic look good and perform well wet.
4
Lighting
Add a motion-sensor night light between the bedroom and bathroom
$8–20 · Plug-in, ready to use
Middle-of-the-night trips to the bathroom are when most falls happen. A light that turns on when you walk past keeps the path visible.
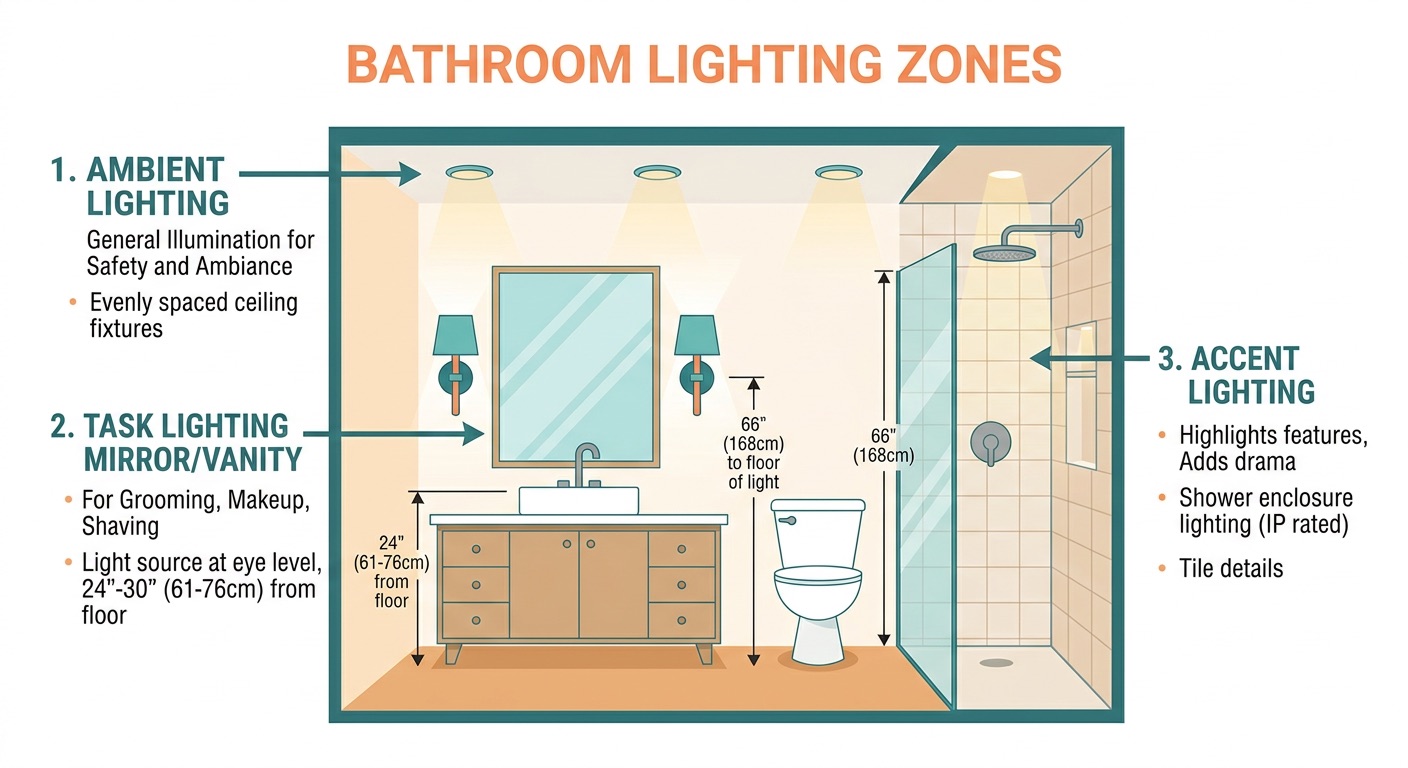
Key lighting zones for aging eyes
Replace dim bulbs with brighter, daylight-temperature LEDs
$5–15 per bulb · Beginner
After 60, your eyes need about three times more light to see the same detail. Brighter lighting in the bathroom makes everything easier to see and use.
Make sure light switches are accessible from the doorway
$10–30 · DIY
If the switch requires walking into a dark room first, a switch plate extension or a motion-sensor switch solves it.
Add lighting inside the shower if it's dim
$50–150 installed · Professional
Many showers are poorly lit. A waterproof LED fixture or a recessed ceiling light makes a real difference when you're trying to see the shower floor and your products.
5
Storage and Accessibility
Move frequently used items to waist-to-shoulder height
Free
Keeping shampoo, soap, towels, and toiletries within easy reach reduces bending and overhead reaching, both of which add strain.
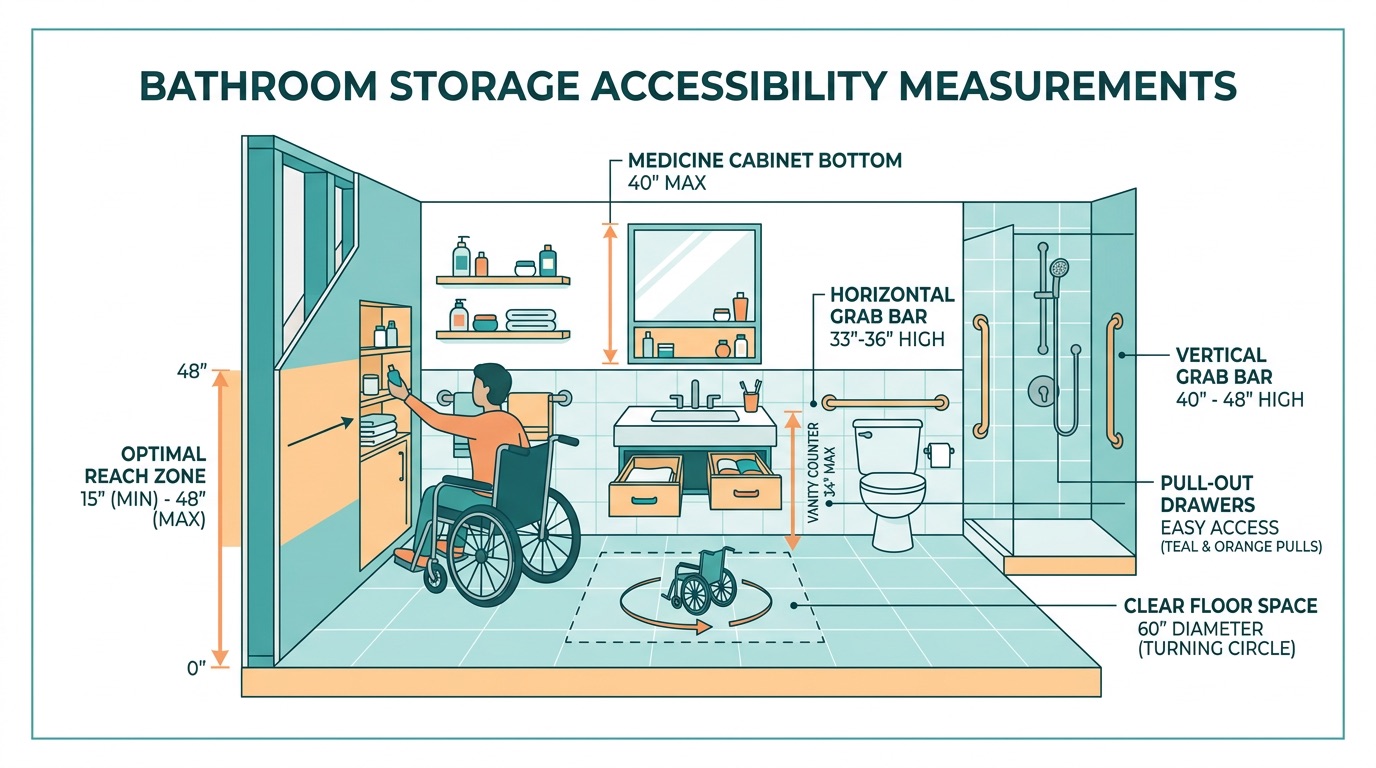
Accessible storage heights for everyday bathroom items
Install a shower caddy or corner shelf at seated height
$10–30 · Beginner
If you're using a shower chair, your products should be at the height where you sit. Adjust storage to match how you actually use the shower.
Replace round doorknobs with lever handles
$15–30 per handle · DIY (screwdriver)
Lever handles open with a push. Easier with arthritis, wet hands, or when you're carrying something.
Consider an outward-opening or pocket door
$100–500 · Professional
An outward-opening or sliding door keeps the doorway clear and makes it easier for someone to help if needed.
Where to Start
The free fixes are a good place to begin. Clearing a path, moving items to a better height, and checking your water heater temperature are things you can do without buying anything or picking up a tool.
Install grab bars into wall studs. If you can't find a stud where you need the bar, use a toggle bolt rated for the weight. This is the one step worth getting right.
Walk through your bathroom at night with the lights off. If you can't see the path from bedroom to toilet clearly, lighting is your first priority.
If you rent, check with your landlord about modifications. Many landlords approve safety changes like grab bars. Some states require it.
A CAPS-certified contractor (Certified Aging-in-Place Specialist) specializes in exactly this kind of work. They'll know what matters most for your specific bathroom. The National Association of Home Builders maintains a directory.